In this tutorial, we will take a look at the basic components of Google Tag Manager structure and how these components work together.
Structure #
Google Tag Manager (GTM) is made up of 5 elements:
- Accounts
- Containers
- Tags
- Triggers
- Variables
GTM’s hierarchical structure has accounts at the highest level, and containers within those accounts. You then set up tags, triggers and variables within each of those containers. The tags fire on triggers and pull in data from variables.
GTM’s hierarchical structure is shown below:
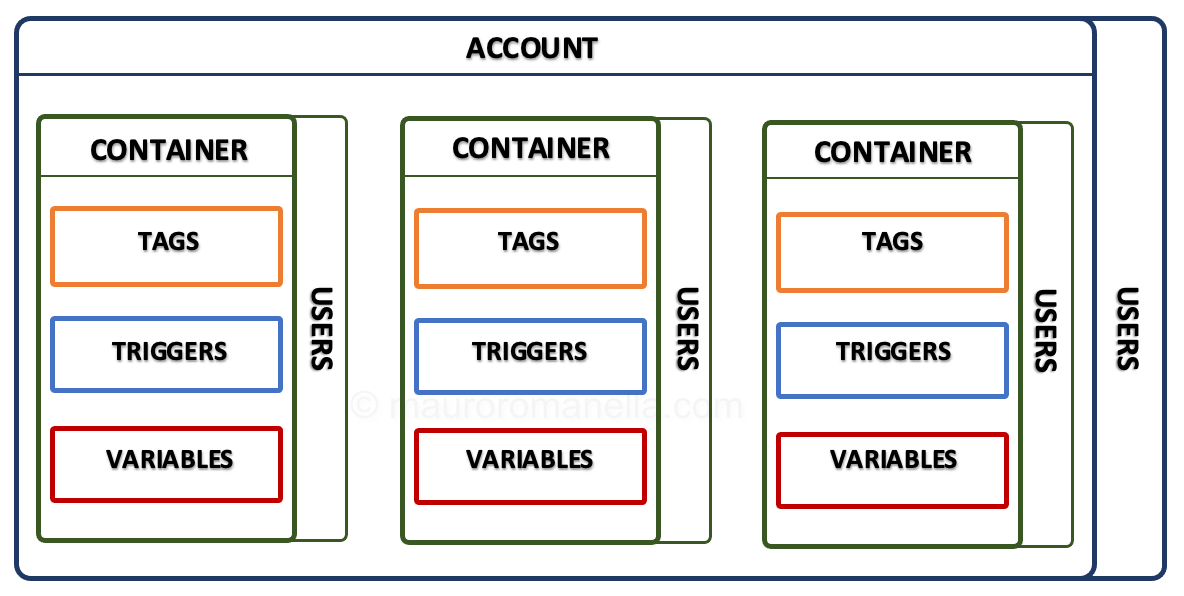
In a nutshell:
The account represents the company while the container the website.
The container contains: tags, triggers and variables.
- The Tag is a tracking code.
- The Trigger is the rule/s under which a Tag should fire.
- The Variable is the value/s pulled when a specific tag is fired.
In the following article we will see, in detail, each of these element separately:
Account #
According to the official documentation,
A Tag Manager account represents the topmost level of organization. Typically, only one account is needed per company. A Tag Manager account contains one or more containers.
Google Doc
In detail:
-
Accounts represents the highest level of the entire GTM organisational structure.
Note: Not confuse Google Tag Manager account with Google account. One unique Google mail user/account can have access to different Tag Manager accounts (up to 400), so you don’t need to create several Google accounts for managing multiple GTM accounts.
Typically, only one account number is required per company.
However, different accounts are useful for separating out large global units, e.g. the North American unit, and the EMEA unit.
Multiple GTM accounts are often used by marketing agencies because they manage the GTM of several different companies.
-
You can either create a new GTM account from scratch or you can add an existing GTM account.
Marketing agencies generally ask their clients to add them, to their existing GTM accounts.
Each GTM account can have one or more containers (up to 500).
By concept, Google Tag Manager account is similar to Google Analytics account. Google Analytics accounts contain Properties (which contain Views), while Google Tag Manager accounts contain Containers (which contain tags, triggers and variables).
Naming Conventions for GTM accounts and containers:
The best practice is to name the GTM account after your company name and your container after the domain name.
For example, if your company name is `XYZ Ltd’ and your website name `www.website.com’ then you should name your GTM account `XYZ Ltd’ and your container `www.website.com’
Containers #
According to the official documentation,
A collection of tags, triggers, variables, and related configurations installed on a given website or mobile app is called a container.
Google Doc
How many Google Tag Manager containers do you need?
Most organizations will set up a single Tag Manager account for all of their containers. Within that account, the most common practice is to use a unique container for each website or mobile app.
Google Doc
In detail:
-
Containers are the spaces we create on Google Tag Manager to put the different tags we will use to collect information.
-
Containers usually equals to websites.
It’s recommended to use one account per client/company and have separate containers for company’s/Websites.
This approach works well if each site is different (in terms of goals and development) as it keeps the setup with Google Tag Manager simple.
Note: If you treat your sub-domain as an entirely different website, then you should create a separate container tag for your sub-domain. Otherwise use the same container tag for both primary domain and sub-domain.
For example:

Each container has an own ID. This is a string like GTM-XXXXX where XXXXX can be any combination of letters and numbers.

Usually account and container ID are requested from external tool for API configuration.
Containers are often separated out based on permissions. If only one group of people is allowed access to a certain site, then it will need to be in a separate container as there is no way to limit access to certain tags.
Each container can contain multiple so called workspaces.
Workspaces #
Most of you are using the free version of Google Tag Manager that allows you to create 3 parallel workspaces. For the paid version (aka Google Tag Manager 360) this is unlimited.
Think of workspaces as branches of your modification inside Google Tag Manager. Lets say you already have your Google Analytics measurement setup and you need to add some Facebook Pixels. Since this can involve lots of changes, you may need more than one day to complete this task. Now lets say you suddenly realize that one of your Google Analytics event tag includes a typo. You change the parameter value but if you decide to publish all changes, you will also publish your newly created Facebook Pixels. But they are not ready to be published!
This is where workspaces can help: if you create a separate workspace for your Facebook tags, you can easily correct any option in your GA tags and publish those changes as they are in a separate workspace. Once your are ready with your Facebook Pixels, you can publish them too and automatically merge your two workspaces into one so that every modification and addition can be live on your site.
Tags #
According to the official documentation,
A tag is code that send data to a system such as Google Analytics.
Google Doc
Google Tag Manager is a tag management system that allows you to update tags on your website quickly and easily.
Google Doc
A tag is a snippet of code that executes on a page or mobile app. Tags can serve a variety of uses, but most of the tags used in tag management systems are designed to send measurement information from your site to a third party.
Google Doc
In detail:
-
A tag is a tracking code.
Note: Tracking codes are code snippets provided by analytics, marketing, or support providers.
A tag sends information about your site to a third party, such as Google Analytics.
-
Tag management solution like Google Tag Manager allows to manage all your tags in one place.
If you don’t use a tag management solution, each tracking code is implemented directly in your website source code across different files. So if you needed to make a minor change, the developer had to: (1) find all those codes, (2) update them.
Tag Manager simplifies and speeds up the process of working with tags. You no longer need to add these tracking code directly to your web pages, but instead configure and publish the tags in the Tag Manager interface, as well as set up how the tags fire.

All tags are managed in one place.
-
Tags are used to collect and send your data to any service you use.
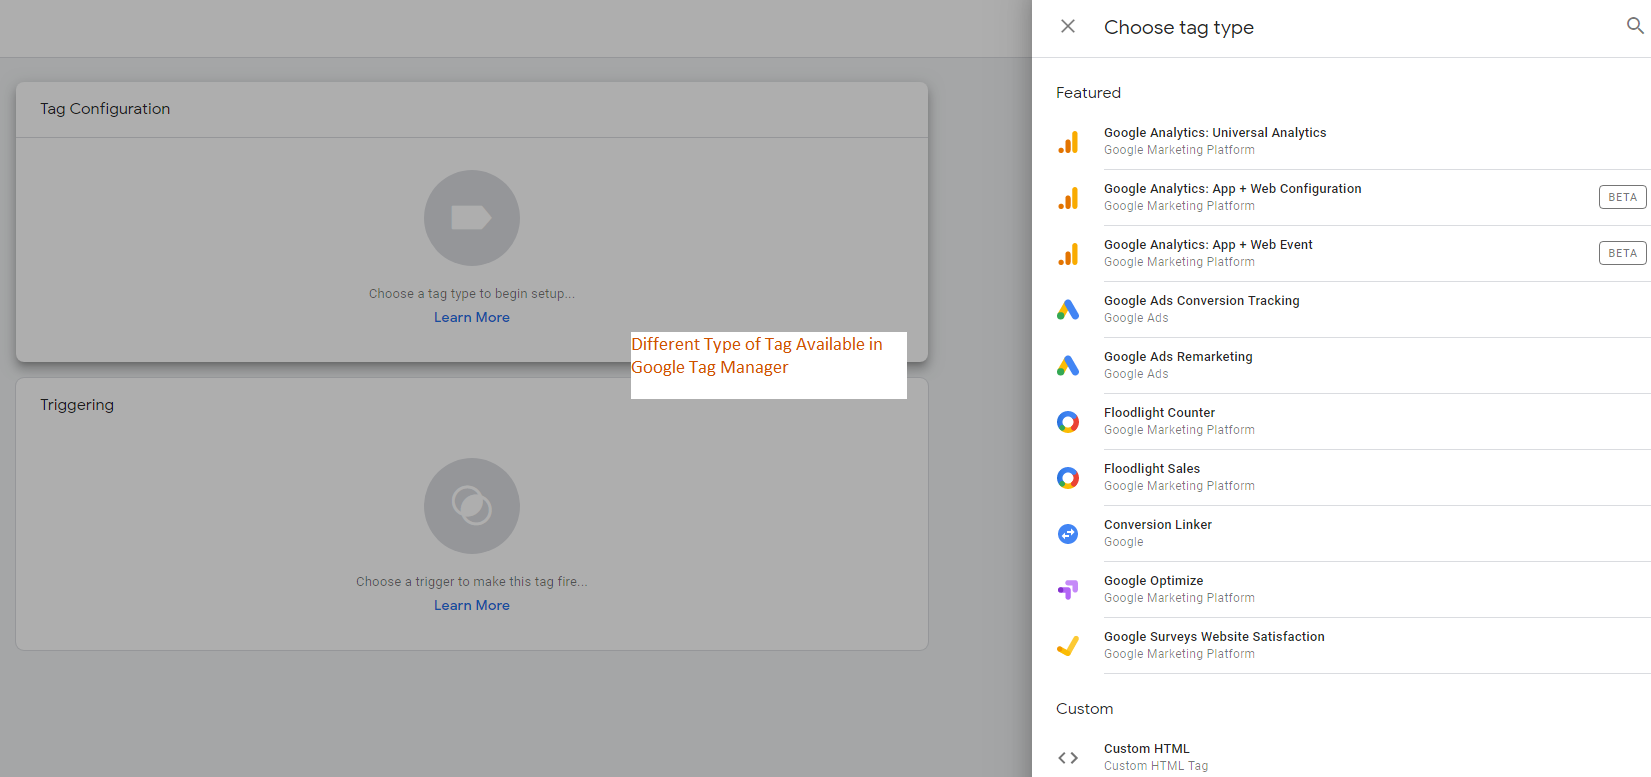
Tag Manager natively supports many different tag configurations. They include tags from Google products, as well as many from third-party platforms. You can also create custom tags if GTM doesn’t support the tag configuration you wish to use.
Note: Google doesn’t recommend the use of custom tags. They suggest that you’re better off asking a tag provider to join their Tag Vendor Program. If you do want to use custom variants, however, you can create either HTML, image, or function tags. You can find full instructions on how to create them here.
- Each tag must have at least one trigger in order to fire.
Triggers #
According to the official documentation,
Tags execute, or fire, in response to events. Events could be page loads, button clicks, page scrolls, etc. In Tag Manager, you define triggers to listen for those events and specify when tags should fire.
Google Doc
In detail:
-
A trigger associated to a tag defines the rule or the set of rules under which the tag is fired or blocked.
Note: For this reason in the previous version on Google Tag manager (before March 2019) triggers was called rules.
So trigger allows that your tags will be fire only when you want them to.
For example, a trigger can have as condition to fire a Tag on every page when the page loads (typically used with the Google Analytics Page View Tag), or only fire a Tag when a user views URLs containing the path /thank-you/ (typically used to track form success page).
Note: A single trigger can be associated to multiple tags.
-
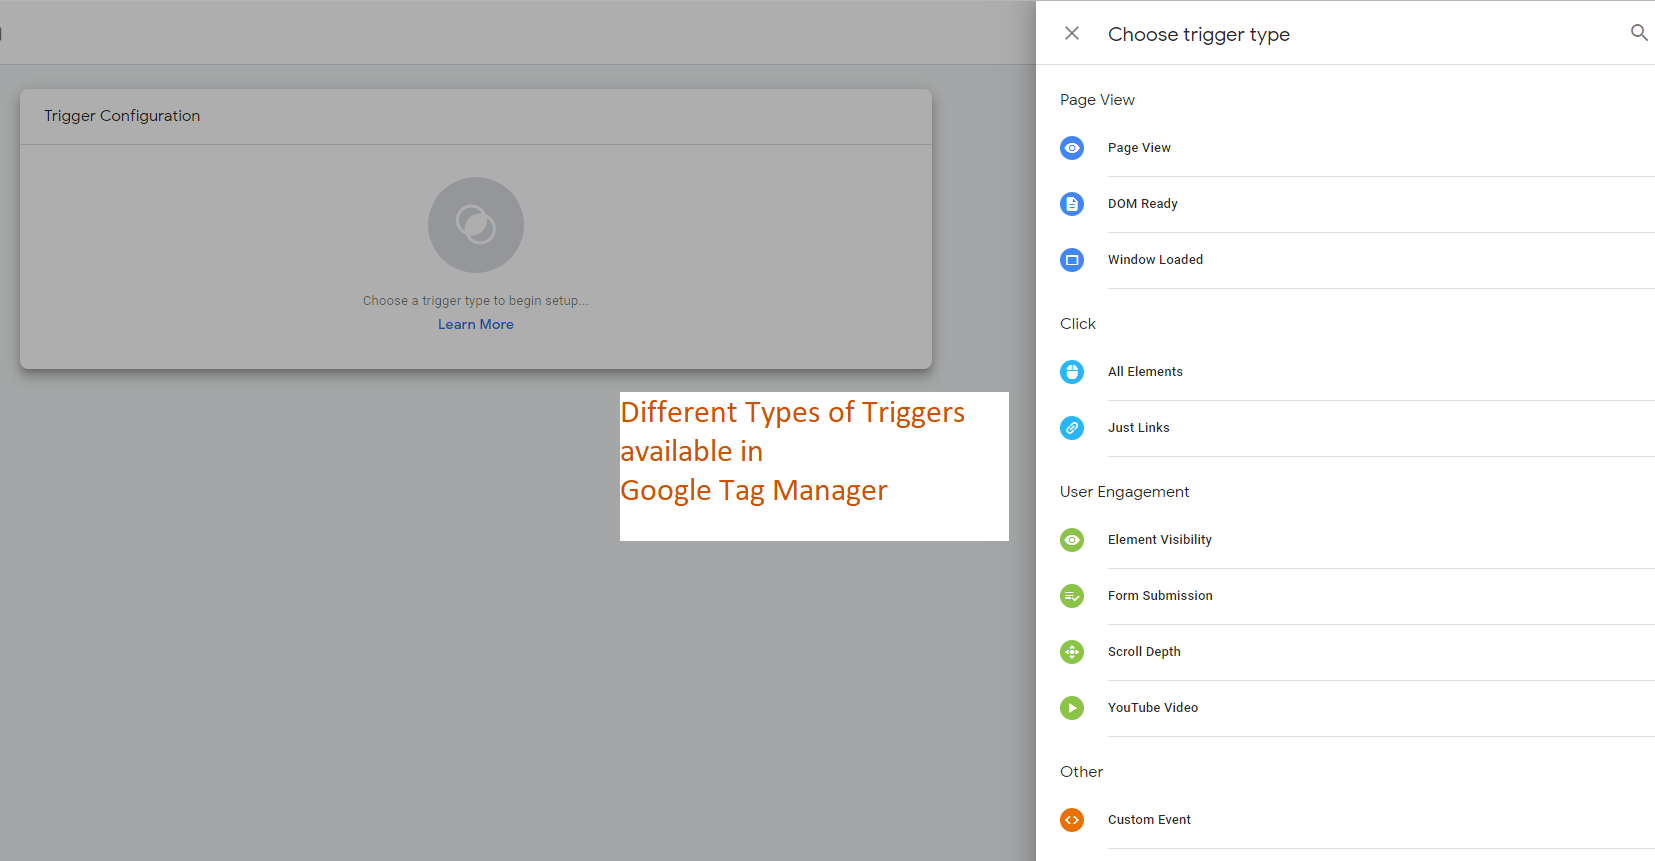
There are many other built-in triggers besides page view in GTM that you can use to fire your tags.
GTM has triggers for YouTube videos, scroll depth, button clicks, custom events and more.

-
A trigger can fire a tag more than once within an event.
For example, you can set up the YouTube trigger to fire based on many different interactions a user has with your embedded YouTube videos.
You can fire this tag when a user starts, seeks, pauses, buffers, or finishes your video. You can also fire this tag based on a user’s viewing progress (e.x. 50% viewed, or 5 minutes watched).

Variables #
According to the official documentation,
Variables in Google Tag Manager are named placeholders for values that are populated when code is run on your website or mobile app.
Variables are used in both triggers and in tags:
- In triggers, a variable is used to define filters that specify when a particular tag should fire. (e.g.: fire a trigger when the url variable contains “example.com/index.html”).
- In tags, variables are used to capture dynamic values (e.g.: pass a transaction value and product ID to a conversion tracking tag).
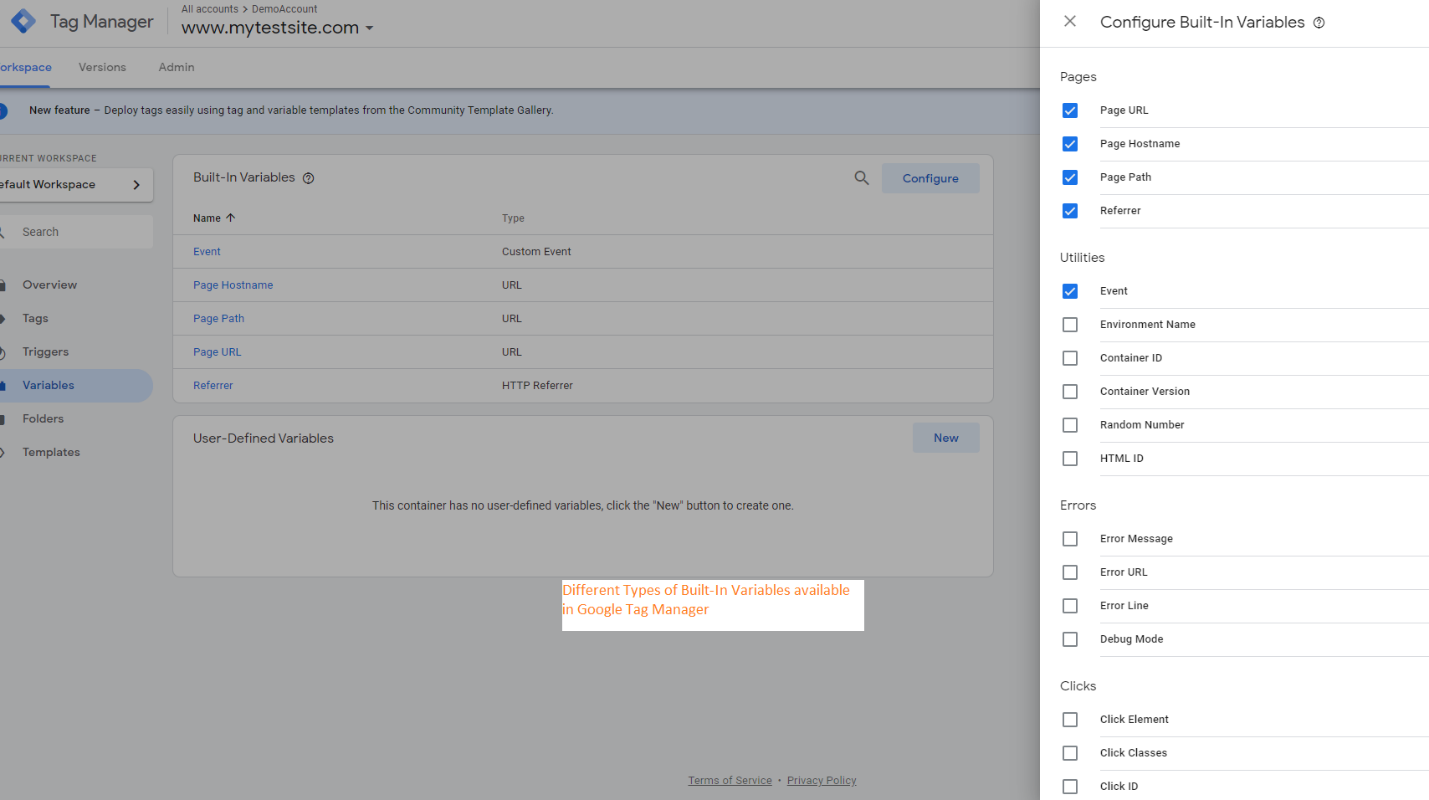
Tag Manager provides a set of predefined built-in variables. Built-in variables handle most needs for tag and trigger configurations. You can also create user-defined variables for web pages or mobile apps to suit specific requirements that might not be covered by built-in variables.
Google Doc
In detail:
-
Variables, in Google Tag Manager, are functions that can be called to retrieve a value.
Syntax: To call a variable in GTM, the variable name must be wrapped in two curly brackets at either side. eg:
{{variable name}} -
All GTM variables will return a value which you can then use into tags, triggers, and other variables:
-
In triggers, variables tells GTM where/when/how to fire a tag.
For example, we want our trigger to fire not on any link click but only on those links where:
Variable:
{{Click URL}}Condition:
matches RegEx (ignore case)Value:
button|bttn|btn

-
In tags, variables define the exact data the tag should collect.
For example, we configure a button clicks tag and we’re interested in 2 pieces of data:
Action:
{{Click Text}}this will pass through the text that is on the button.Label:
{{Click URL}}this will pass through the full link that was clicked by the user.

Note: The value of the GTM variable is populated during run time from: Data Layers, Javascript Variables, First Party Cookies or HTML DOM.
-
-
In Google Tag Manager, variables are sorted into three main categories:
Built-in variables (which are pre-defined by GTM and not customize).
User-defined variables (which you can create and customize).
Data layer variables (which are used to push data from your website into GTM).
built-in variables
Built-in variables are a special category of variables that are pre-created and non-customizable.
Google DocIn detail:
-
Google Tag Manager (GTM) includes a number of pre-defined variables that provide common information on your website related to clicks or pages (such as the Page URL, Click URL, Scroll Depth, etc.).
-
By default, built-in variables are disabled in all new GTM containers, but can be quickly enabled by the user going to Variables > Configure (in the Built-in variables section) > Check the box next to the ones that you’d like to use.
⚠️ Pro Tip: Activate all of the build-in variables so that they are available to be used anytime.

-
When you enable the built-in variables, Google Tag Manager will ‘listen’ for these events.
In the previous example we used
{{Click Text}}and{{Click URL}}that are two build-in variables that when enabled, Google Tag Manager will automatically detect the text and the url of any elements clicked on the website. The Google Tag Manager Built-in variables have two features, which, at the same time, represent two limitations. They are:
Pre-created: However, in some cases, you’ll need variables that aren’t covered by the default pre-selection.
Non-customizable: However, in some cases, you’ll need to convert built-in variables into user-defined variables.
User-defined variables
Create custom user-defined variables in Google Tag Manager to suit specific requirements that might not already be covered by built-in variables.
Google DocIn detail:
User-defined variables in Google Tag Manager (GTM) are variables that you create and customise yourself to track specific data on your website.
-
Therefore, unlike the build-in variables, the user-defined variables are:
Not Pre-created:
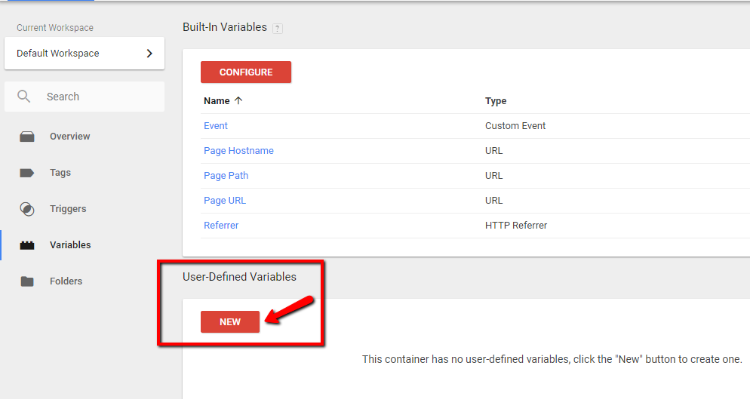
To create a user-defined variable in GTM, you need to first go to the Variables tab in your GTM account and click on the “New” button. This will open a menu where you can select the type of variable that you want to create.

These cover navigation, page variables, page elements, utilities and container data. We won’t cover the different variables in this post, but I’ll show you (next paragraph) some examples.
In case you’re curious, here’s a list of the variable types you can create
After you have created and configured your user-defined variable, you can use it in your GTM triggers and tags just like a build-in variable.
Customisable:
In the URL variable, expand More Settings section
Component type = “Query”.
Query Key = “product_id”.
Choose the
{{Click URL}}(predefined variable) as a URL source.-
Having the ability to create and use custom variables allows you to use GTM more effectively when built-in variables come in limited.
What’s limiting the built-in variables is that they are not fully customisable, so sometimes you need to build off of them.
One of these circumstances is, for example, when you want to store the query string parameter from a clicked URL.
Say, you have a button link on your site that looks like this:
https://site.com/page?source=email&product_id=123As we saw previously, using the build-in variable
{{Click URL}}we can easily store the full URL of the destination page of a URL that get clicked.… but if you want a specific param from a clicked URL?
To get at that query string we need to create a custom variable that is of the type called a “URL”.

Reference and Useful Links #
- Set up and install Tag Manager by Google: Link
- Organize your containers by Google: Link
- Components of Google Tag Manager by Google: Link
- About variables by Google: Link
- Built-in variables by Google: Link
- User-defined variables by Google: Link

This is so perfect