In this tutorial, we have a look at the data layer: what it is, how it works, and how it can benefit your business.
Reference #
- Google Doc – The data layer: Link
- Analytics Mania – Data Layer Explained: Link
- Seer – Data Layer for Enhanced Site Tracking: Link
Why use a Data Layer? #
There are two primary methods to collect data into analytics and marketing tools: data layers and DOM scraping.

DOM Scraping
DOM scraping involves looking at your page’s HTML attributes and copying data for reporting from their values. This method allows you a great amount of flexibility in tracking as you do not have to get IT involved for many changes. However, with this flexibility also comes a great amount of unreliability due to the HTML structure constantly being in flux by web developers, and you might not even know when it changes.
Data Layers
Implementing a data layer takes time up front, but provides a reliable method to control data values by separating the data from the HTML structure. In other words, no matter what the web developers do to the structure of the HTML page the data layer will always be the same.
For example, if you are tracking the data stored in a H2 heading of the HTML markup, a single change to the markup or the format of the information in this HTML element would compromise data collection from the site to your tracking tool. If, however, the data were stored in a Data Layer you don’t have the risk of site changes breaking your tracking by accident (unless of course, someone/something breaks the data layer itself).
What is a Data Layer? #
In short, a data layer is a JavaScript object that contains the data that gets generated on a web page.
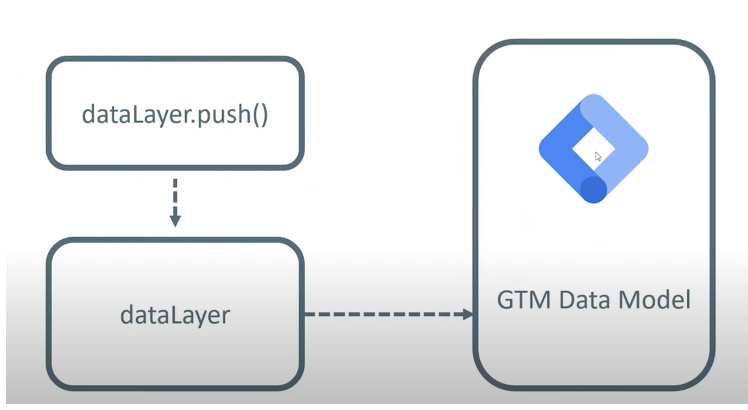
You can imagine it as a virtual layer between your website and your tag management solution (such as Google Tag Manager), where you can store, process, and pass data.
That’s why it’s called data layer.

The diagram above should elucidate my point: the data layer contains the data that gets generated on a web page. Google Tag Manager (and other tag management solution) can read this data and thereby can be passed on to various analytics or marketing tools (Google Analytics, Google Ads, Facebook, LinkedIn, etc.).
The information in the Data Layer can be used by any application which has access to the global namespace of this page. In the following post we will have close look at the Google Tag Manager data layer.
How to implement GTM Data Layer #
Once you place the Google Tag Manager container’s JavaScript Snippet in your website’s source code, the Data Layer is automatically created. You don’t have to add anything more.
There are a couple of ways to find sites’ data layer:
- Data Layer via Browser Console
In Chrome, right-click the web page and select
Inspect. Then, navigate toConsole. If you see anything there, right-click and selectClear Console. Then, type indataLayerand pressenter.
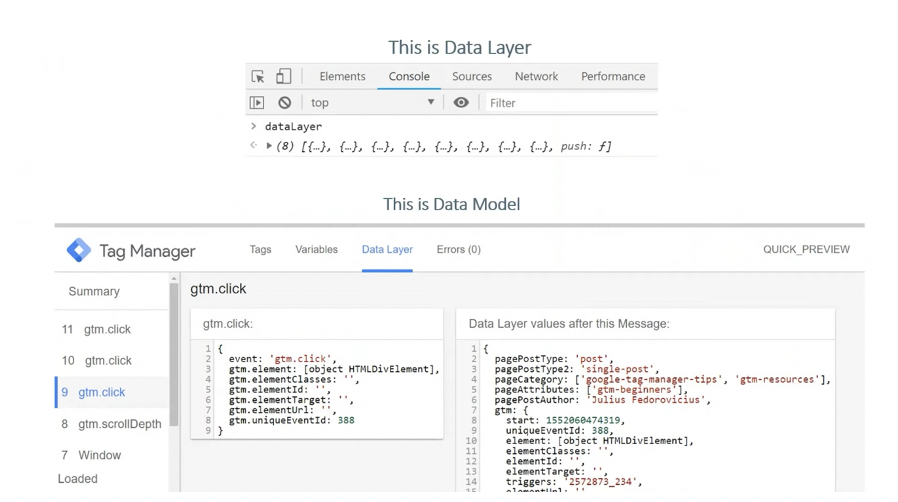
If we clicked on the arrow, you could see what kind of content was pushed.

- Data Layer via GTM Preview Mode
You need to activate Preview Mode within your GTM workspace.

Usually, the content of your website’s data layer and your Google tag manager data layer is the same but there might be some situations when is different.
This because what is called data layer in Google Tag Manager, technically, is not the data layer but is the data model.

Let me clearly that:
Google Tag Manager doesn’t access the data layer’s structure directly.
When data layer push occurs, the data is pushed into the website’s data layer, then based on that data layer push, the information is stored in Google tag manager internal data model.

This is possible due to the push function at the end of the dataLayer array

The data layer push function of Google tag manager is a bit modified. It not only adds an element to the array but it also then takes that information and transfers the copy of that information to Google tag manager internal data model.
If this push function does not exist, even though you can see the information in the website data layer, it will not update your data model in your Google Tag Manager.
So, when in Google tag manager you are using data layer variables, let’s say a custom event trigger. Google tag manager read the data from the internal data model, not in the website data layer.
How to Create GTM Data Layer to Track Custom Data #
However, if you want some more custom data, like userID, Product price, Order total, etc. (and use that in Google Tag Manager), you need to push this information in the Google Tag Mager data layer.
To set up your data layer, add the following snippet of code to the head of your page above your container snippet:
window.dataLayer = window.dataLayer || [];
window.dataLayer.push({
    // variables
});
The dataLayer.push will go through the following process:
- The first line
window.dataLayer = window.dataLayer || [];check if a variable calleddataLayeralready exists. The JS operator||return true or false:
- If true, means that the
dataLayeralready exists and we use it. - If false, means that the
dataLayerdoesn’t exists and we create a new empty Array[]to it.
This ensures that our existing data layer is preserved, it’s avoid writing off or over any dataLayer that is already there. For this reason, you can place the above snippet anywhere in the code (above or below Google Tag Manager container).
- If true, means that the
- The second line
window.dataLayer.push({ });push the data

dataLayer.push, I use window.dataLayer.push). The advantage of using the “window” prefix is that you can avoid conflict with any local Javascript array variable that uses the “dataLayer” name.
The above snippet is an empty object { } that can be populated with information to pass to Google Tag Manager.
The data layer can hold static or dynamic information. For example, you can put static page information, such as the page category or transaction value, into the data layer. Furthermore, you can push information into the data layer as events occur on a page.
For example, we might want to set dataLayer variables within the dataLayer to indicate that the page is a signup page and the visitor has identified as being a high-value customer. To do so, we’d populate our data layer as follows:
window.dataLayer = window.dataLayer || [];
window.dataLayer.push({
    'event': 'trackEvent',
    'userID': '123456',
    'pageCategory': 'google-tag-manager-tips'
});
As you can see, I added within the curly bracket a set of JavaScript objects, which are made up of keys and values (also called variables). In this code example, the first key is “userID,” and its value is “123456”, the second key is “pageCategory,” and its value is “’google-tag-manager-tips”.
You can think of the key as the question and the value as the answer. When a visitor lands on your website, the dataLayer goes down the list of questions (keys) and populates answers (values). Then, Google Tag Manager will gain access to this information.
In the examples above, we have used, also, the special data layer key called event. Event keys aren’t strictly necessary for a data layer push, however, if you push dimensions without an event key, you can’t access the dimension values at that current state — they will be inaccessible to GTM until the next event key gets set. So as a best practice, always include an event key on every data layer push.
Every tag in GTM needs an event key to trigger it.
Ana Kravitz
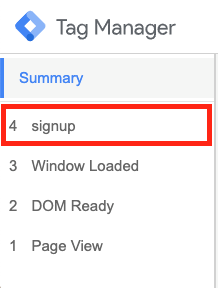
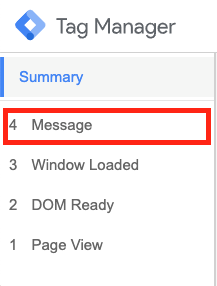
Below are two screenshots of how the Google Tag Manager preview & debug mode looks like when the above dataLayer.push is done. The first example is with the “event” as part of the push and the second is without.


In the first case, the event name enables a marketer to use it in their triggers where they can fire a tag based on a custom event trigger. Without the event name, this is not possible as no custom event actually occurs in this case.
GTM dataLayer.push syntax #
Passing an event key and a set of key-value pairs in the data layer, like the example above, is pretty basic and is the standard syntax for a GTM data layer.
However, the GTM dataLayer.push syntax can get much more complex than this: it can push data as objects or arrays.

GTM dataLayer.push with array
In some cases, the value of your data layer key will be an array, rather than a single value. Here’s an example where you’re pushing a page with multiple categories:
window.dataLayer = window.dataLayer || []
window.dataLayer.push({
    'event': 'trackEvent',
    'pageCategories': ['Marketing', 'Measurement', 'Implementation'];
});
The Standard E-commerce Data Layer push for GTM uses a bit more difficult data structure. In this example snippet for tracking products transaction, we push an array transactionsProducts containing two objects. Each object contains the same set of keys (sku, name, category, price, quantity) but their values are different:
window.dataLayer = window.dataLayer || [];
window.dataLayer.push({
    'transactionProducts': [{
        'sku': 'DD44',
        'name': 'T-Shirt',
        'category': 'Apparel',
        'price': 11.99,
        'quantity': 1
    }, {
        'sku': 'AA1243544',
        'name': 'Socks',
        'category': 'Apparel',
        'price': 9.99,
        'quantity': 2
    }]
});
You may notice that within the Data Layer some values are captured within quote marks and some are not. If the key-value is a number should not be captured in quote marks, whereas if the key-value is a string (letters, numbers, and characters) should.
GTM dataLayer.push with nested object
In some cases, you will sometimes also want to pass in nested key-value pairs into your data layer. Probably the most common example of this is when you implement the the various Google Analytics Enhanced Ecommerce data layer pushes for GTM, as described here. In this example snippet for tracking cart adds, there’s an ecommerce object that contains a products key. Within this product key, you can see key-value pairs (product name, product ID, product price, product brand, product category, product variant, and product quantity):
window.dataLayer = window.dataLayer || [];
dataLayer.push({
    'event': 'addToCart',
    'ecommerce': {
        'currencyCode': 'EUR',
        'add': {
            'products': [{
                'name': 'Triblend Android T-Shirt',
                'id': '12345',
                'price': '15.25',
                'brand': 'Google',
                'category': 'Apparel',
                'variant': 'Gray',
                'quantity': 1
            }]
        }
    }
});
How Google Tag Manager use information in the Data Layer #
Google Tag Manager uses the values in the data layer in two primary ways:
to gather certain kinds of data
to evaluate more advanced firing rules.
To do that you need to push these values into triggers and variables.
So if, for example, you’re pushing an event called trackEvent into the data layer, in GTM you now need to go to Triggers > New > Custom Event and enter “Event name = trackEvent”.
Similarly, if, for example, you’ve pushed a key named pageType into the data layer, in GTM you should go to Variables > New > Data Layer Variable and enter Data Layer “Variable Name = pageType”.
Then you can use trackEvent as a trigger, and push pageType into any of your tags.
Unfortunately, the topic is kind of big to effectively tackle in one blog article. More detail about the implementation of GTM custom event and GTM data layer variable is coming soon in another blog post.

wow, awesome post.Really thank you! Much obliged.
Fantastic blog post.Much thanks again. Awesome.
Wow, great article post. Really Great.
Awesome blog.Really looking forward to read more. Cool.
Im thankful for the article post.Really looking forward to read more. Fantastic.
Thanks a lot for the blog article.Thanks Again. Awesome.
I am so grateful for your blog.Thanks Again.
Fantastic post.Thanks Again. Really Great.
A round of applause for your blog.Really thank you! Great.
Awesome blog.Much thanks again. Keep writing.
Im grateful for the blog.Thanks Again. Really Cool.
Enjoyed every bit of your article.Much thanks again. Will read on…
Hey, thanks for the blog.Much thanks again. Really Cool.
Really enjoyed this blog post. Really Cool.
Very well explained, thank you!